LAUNCHING THE WRITING WORKSHOP: THE FIRST 5 DAYS
Writing workshop may very well be the best classroom structure we have for differentiating instruction
and supporting self-regulation.
Read more about the ways Writing Workshop builds independence.
THE FIRST 5 DAYS
DAY 1: Love it or Loathe it?
Here’s a low threat, low prep activity that builds confidence and teaches students some important lessons about topics for writing. The best writing comes from topics the writer cares about. And what’s better than something we absolutely love or truly cannot stand? Start by modelling your own Love it or Loathe it Chart (Teacher rule: model, model, model!), then have students create their own. Scroll down for a complete minilesson.
When the students have had a chance to write and share their lists with others, tell them to choose one of the topics on the list and just write anything about it. If they are using pen and paper, establish the routine of writing on only one side and double-spacing their writing (to accommodate revisions later). Tell them to spell and punctuate as well as they can; no one else will see this piece in this form. If they finish before the time is up, tell them to choose another topic and start to write. Keep the writing time short; you’ll gradually increase time and stamina.
DAY 2: You’re Never Done Writing Until Writing Time is Done
Start by revisiting your sample piece from the previous day and model adding details to complete the piece. Use this to remind students of the first rule of Writing Workshop: you are never done writing until writing time is done. Tell students that they have to decide how to use writing time – to complete an unfinished piece or start a new piece with another of the topics from the Love it or Loathe it Chart. Gradually increase the length of writing time. You might want to introduce Author’s Chair or sharing time for about 10 minutes at the end of the workshop. Students take turns reading a piece of their writing for the rest of the class to give compliments and ask questions for clarity. This is a good time for the teacher to start modelling some of the language you can use to talk about writing.
DAY 3: Managing Time and Materials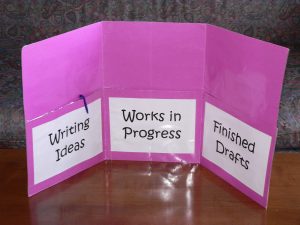
By now, your students should have a couple of pieces of writing – and maybe more. It’s time to think about organizing their individual sheets of paper. The 3-pocket Writing Folder is one organizational tool that we use at HIP, although there are many other types. Click here for instructions and details. We use the three pockets for storing topic ideas and planning sheets, unfinished pieces and completed drafts. You might want to spend some time “personalizing” the writing folders, then use the rest of writing time to Start a Piece or Finish a Piece.
DAY 4: Revision Tools
Revising is one of the biggest challenges for young writers. Revising involves making a piece of writing more interesting, clear and powerful; it has nothing to do with correcting spelling and conventions. We can make it a little less painful by encouraging students to do all their revising without rewriting, by using a strikethrough or caret to change or insert details. (Of course, for those who are word processing, revision is already pretty painless.) Depending on the sophistication of your students, you might just introduce one revision strategy at a time. Later, you might demonstrate adding or moving large chunks of information using spider legs or cut-and-paste (with good old scissors and tape!)
Ask students to go back into one of their completed or incomplete drafts and make at least 2 revisions before moving on to another piece. They now have three alternatives for writing time: start a piece, finish a piece, revise a piece.
DAY 5: Peer Conferences
One of the reasons revision is so difficult for young writers is that they often don’t know what they need to do to make a piece better. It’s important to constantly remind students that we write for an audience. Our writing might make perfect sense to us, but if our readers can’t understand it, then it’s lost its impact. Sometimes a conference with someone else is needed to let the writer know what might be confusing to a reader or what the reader might want to know more about. A good place to start is with “Stars and Wishes.” Stars are compliments about the piece of writing, things the reader enjoyed or found particularly interesting. Wishes are questions about the content of the piece: “I wish you would tell more about…” or “I wish you would explain…” The writer then has the option of revising the piece in response to the peer’s questions. During this process, the writer reads the piece aloud; there is no need for the peer to even see the writing – and certainly not to comment on errors in conventions.
LOVE IT OR LOATHE IT!
One of the hallmarks of the Writing Workshop is self-selection of topics. But too many of our students have trouble thinking of topics to write about. That’s why it’s important to have a repertoire of topics in their writing folders.
I DO: Tell students that the best writing comes from topics that a writer feels strongly about. In this lesson, they will have an opportunity to generate a list of things they absolutely love and things they loathe (a great new vocabulary word!)
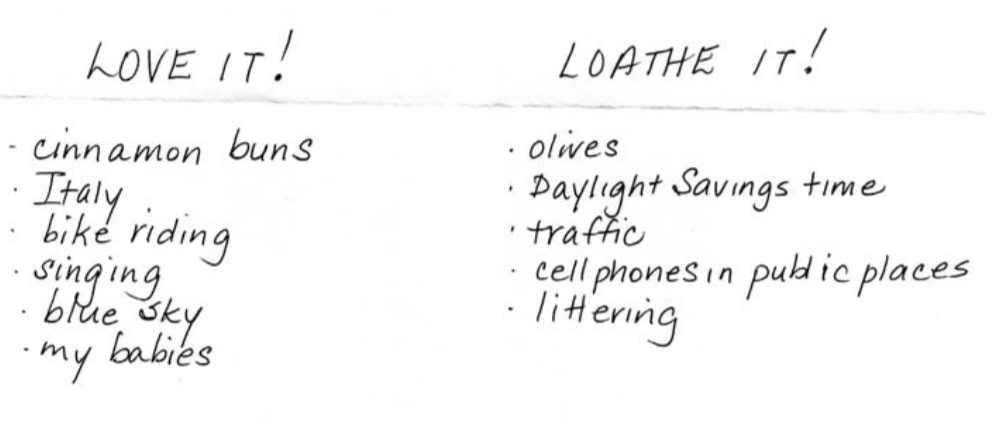 Even something as simple as a two-column chart should be demonstrated before students are expected to tackle it on their own. Make a T-chart by folding a piece of paper in half. Label one half “Love It” and the other half “Loathe It.” In each column, generate a list of objects, food, places, activities, habits, hobbis, and beliefs that you adore or abhor. (The only rule is: no people’s names in the “Loathe It” column.) As you write, talk through your thinking for the students.
WE DO: Guide the students as they create their own Love it or Loathe it Charts, with about 6-8 items on each side. Then have them share and discuss their lists with a partner, to rehearse their thinking before they have to write. Students can tuck this list into the “Ideas” pocket of their writing folders to be available when needed as topics for writing.
YOU DO: Tell students to choose any topic on their list and write as much as they can about the topic. They should spell and punctuate as well as they can; no one else will see this piece of writing in this form. If they finish before writing time is up, they should choose another topic and begin writing. Start a new sheet with each new writing piece and be sure to name and date each one.
WRITING ASSESSMENT
What should we look for in student writing? This quick and easy checklist can help you identify what your students know and can do as writers. Click here or on the image below for a printable pdf and a more detailed three-level rubric.
